This post is also available in:
![]() Français
Français
Add your Easyhosting email to your iPhone to check your email messages on the go.
With these steps, you should be able to successfully set up your iPhone to check your domain-based email. Enjoy the convenience of having your professional email at your fingertips!
What you need to set up your email address
There are a few things that you need to know before you can set up your email address on any mail client.
- Email username
- Email password
- Mail Server
- Server Ports
- Additional security settings
While most of this information is the same for all Easyhosting accounts, you will need to know your email username and password. The username is the entire email address, including the domain name. For example, if your email is support@easyhosting.com, your username would also be support@easyhosting.com.
There are some mail servers that will let you use only the mailbox name (support, in this case). This will not work on our servers.
Mail server settings
| General Settings | |
| Username | your mailbox name |
| Password | your email password |
| Incoming Server Settings | |
| Server Name | mail.easyhosting.com |
| POP Port | 995 |
| IMAP Port | 993 |
| Outgoing Server Settings | |
| Server Name | mail.easyhosting.com |
| SMTP Port | 465 |
Setting up a new account
Here is the process of setting up a new mailbox on your modern iOS device. If you have a legacy iOS device, you will find some of the menus are slightly different. We will point out when this may be the case.
Create the account (modern devices)
- Open your Settings app
- Tap on Mail
- Now, tap on Accounts (if you do not see Accounts here, it is possible you have a legacy device)
- In the Accounts app, click on Add Account
- In this list of different email accounts, tap on Other
- Tap Add Mail Account
Create the account (legacy devices)
- Open your Settings app
- Tap on Passwords and Accounts
- At the bottom of the list, tap on Add Account
- In this list of different email accounts, tap on Other
- Tap Add Mail Account
Enter your account information
You will now be asked to enter your account information
| Name | Your display name, does not need to be the mailbox |
| Your full email address | |
| Password | Your email password |
| Description | A nickname for this mailbox on your device, can be whatever you like (Work mail, personal address, etc.) |
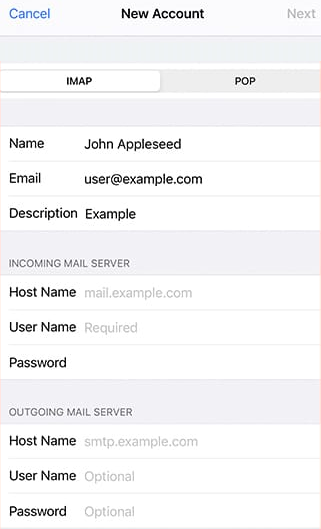
Once you have your information entered, tap Next at the top right. You will now see the main screen where you will need to enter your account settings.
First, you will need to choose whether you want to set up an IMAP account or POP account. Our mail servers will support both protocols, so the choice is yours. See this article for more information on the differences between IMAP and POP mail protocols.
IMAP accounts sync all mail with your mail server. POP accounts download and remove mail from the mail server. If you are uncertain, choose IMAP.
Some of the information will be populated already, and some may say that it is optional. However, it is better to complete all of the fields.
Incoming Mail Settings
Enter the incoming mail server settings mentioned above.
| Host Name | mail.easyhosting.com |
| User Name | your full email address |
| Password | your email password |
Outgoing Mail Settings
Now enter the outgoing mail server settings mentioned above. Although it may say optional here, it is better to enter the information here.
| Host Name | mail.easyhosting.com |
| User Name | your full email address |
| Password | your email password |
Finished
Once you have all of your information entered, click the Next button in the upper right. Congratulations!! You have now set up your Easyhosting email on your iOS device.
Updating an existing account
There may come a time when you will need to update an account that was previously set up on your iOS device. Maybe you updated your password or something else may have changed. iOS devices are notorious for breaking mail setups when updating as well.
If you need to check or update your mail settings, follow these steps below. However, before you start, make sure that you have the mail settings above and ensure you have your correct email password. If you are not certain you have the correct password, the best way to check is to try logging into your Webmail.
Access your mail settings (modern devices)
First, you will need to access your email settings
- Open your Settings app
- Tap on Mail
- Find and Tap on Accounts
- Find your account in the list and tap on it.
Access your mail settings (legacy devices)
First, you will need to access your email settings
- Open your Settings app
- Tap on Passwords and Accounts
- Find your account in the list and tap on it.
You should now see your account information. How your proceed now will depend on if you are having issues with both sending and receiving mail, or on sending only, which is more common. If you are having issues with incoming mail, it is best to correct that issue first before attempting outgoing mail.
Incoming Mail Settings
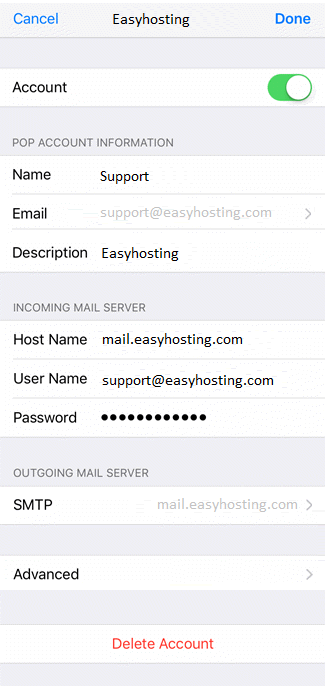
You will see the Incoming Mail Server settings in the middle of the first screen. Take note of whether it says POP or IMAP Account Information above the account information. This will determine which port number you use.
Check to ensure that your Host Name, User Name and Password is all entered correctly. We recommend entering your password even if you have not updated it.
Once you have these settings entered, click on the back button in the upper left of this screen. It will display the account name.
Now, click on Advanced at the bottom of the screen.
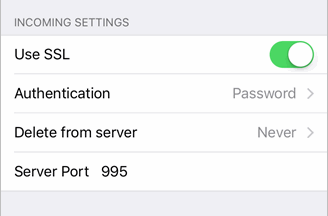
In the Advanced section, you will see many options, however, we only need the Incoming Settings, which are close to the bottom.
| Use SSL | Must be On |
| Authentication | Password |
| Delete from server | Never |
| Server Port | IMAP: 993 POP: 995 |
After entering your information and ensuring that it is all correct, tap on the back button in the upper left. Once you are back to the first page, tap on Done at the top right, even if you still need to change your outgoing settings.
Once it validates that the incoming settings are correct, you can go back in and update your outgoing settings.
Outgoing Mail Settings
Now that your incoming mail is working, it is time to check your outgoing mail settings.
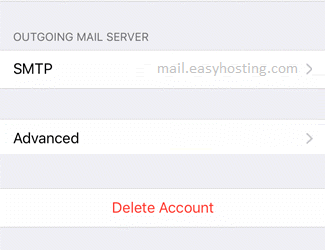
Near the bottom of this section, you will see the Outgoing Mail Settings. Next to SMTP, (Simple Mail Transfer Protocol) you will see your outgoing mail server. Click on SMTP to check the settings.
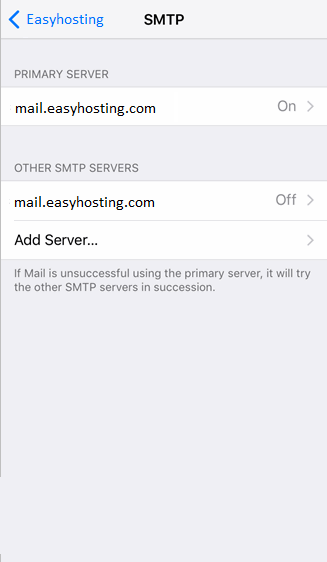
On this screen, you will see all of the SMTP servers that are currently set up on your device. However, we only need to worry about the Primary server.
Tap on the primary server to proceed.
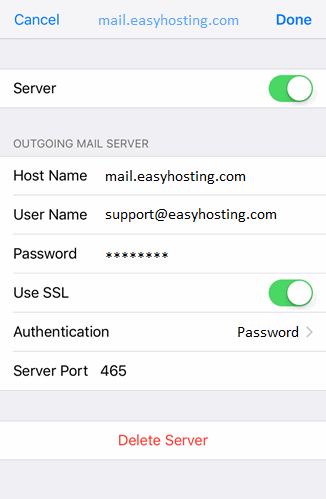
You should now be looking at the current outgoing server settings. You will need to ensure that the settings are entered correctly here. Some of the settings may say that they are optional, but it seems to work better if you enter all of your settings.
| Host Name | mail.easyhosting.com |
| User Name | your full email address |
| Password | your email password |
| Use SSL: | this must be toggled On |
| Authentication | must be set to Password (see below) |
| Server Port | 465 |
If you need to change the Authentication, you only need to tap on the current setting. You will now have a list to choose from. Select Password and the tap the back button in the upper left.
Once you have all of your settings entered correctly, tap on Done in the upper right-hand corner. This will cause the device to validate your settings. Once completed, setup is complete and you will be able to send mail from the device.
Troubleshooting issues
- Double-check your password and server settings if you encounter issues.
- Make sure that SSL is enabled for SMTP in your outgoing mail server settings.
- Confirm that the port numbers for incoming and outgoing servers are correct.
Still need help?
If you are in need of assistance, you can contact our support staff using one of the following methods:
Send us an email – 24/7/365
- Technical Support
- Billing Issues
- Sales Inquires
Live Chat – 24/7/362
Access our Live Chat support team from your Easyhosting Portal
Phone Support – Monday to Friday, 9:00am to 7:00pm EST
Call one of our Phone Support team members anytime between 9:00am and 7:00pm, eastern time at 1-888-390-1210.